

This information is provided for educational purposes only. Please consult a healthcare professional.
Taking your own blood pressure can be an important part of your general health care. Frequent and reliable measurements of blood pressure are the best means of detecting the onset of high blood pressure and for determining the effectiveness of any treatment program.
Your physician may have given you some instruction in taking your own blood pressure, but sometimes it is hard to remember everything the doctor has told you.
About Blood Pressure
Blood pressure is the force of blood against the walls of the arteries - the blood vessels that carry blood from the heart to all parts of the body. Each time the heart beats, the pressure in the arteries increases. Each time the heart relaxes between beats, the pressure goes down.
Therefore, there are two measures of blood pressure: the highest blood pressure when the heart beats, called the "systolic" pressure; and the lowest pressure when the heart relaxes called the "diastolic" pressure.
When we read a blood pressure, we say for example "120 over 80", giving the systolic number first and the diastolic number next. This means that when the heart beats, the pressure is 120 mmHg (millimeters of mercury), and when the heart relaxes, the pressure is 80 mmHg.
What Is Normal? What Is Not?
No two people have exactly the same pressure, nor is a person's blood pressure necessarily the same from one moment to the next. That is why we speak of blood pressure being in "a normal range". Any healthy individual can have times when his or her blood pressure is above the normal range, but if it remains above this range, we call it high blood pressure (also called hypertension). There are no symptoms for high blood pressure; in other words, you don't feel any different when you have high blood pressure. The only way to detect high blood pressure is by measuring it with a sphyg. If high blood pressure is not treated, it can lead to the damage of many parts of the body, resulting in a stroke, kidney disease, or a heart attack.
What Do The Numbers Mean?
For people under the age of 60, it is generally accepted that blood pressure below 140/90 are normal, up to 160/95 are borderline, and above 160/95 are considered high blood pressure. In general, if your blood pressure readings are higher than 160/100, a serious condition may exist. See your personal physician immediately. It is important to remember that home blood pressure measurements may be significantly lower than those made in the doctor's office. If you are taking your blood pressure to monitor the effects of a treatment program, make sure that you keep careful records of your home readings. DO NOT change your medication because of any readings you take. Only your doctor can correctly interpret your blood pressure measurement.
Measure Your Own Blood Pressure
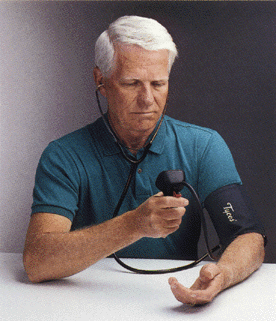
The following instructions are for the Welch Allyn Tycos Home Blood Pressure Kit.
You may take your blood pressure on either arm, although most people choose the left. The arm should be bare. If you roll up a sleeve, be certain that it is not so tight that it cuts off circulation to the arm. Slide the cuff onto your arm to a position just above the elbow.
Now rotate the cuff so that the chest piece of the stethoscope is about one inch above the elbow and under the biceps muscle. This is where the brachial artery runs. By putting your finger along this spot, you may be able to feel the pulse. Make sure the stethoscope chest piece is over the pulse spot. Tighten the cuff by pulling the tail of the cuff through the D-ring and wrapping it back over the fastener. Make sure the chest piece is placed correctly or you won't be able to measure your blood pressure accurately.
Sit at a table with your forearm resting comfortably at about heart level. The room should be quiet.
Place the ear tips of the stethoscope in your ears, remembering to turn ear tubes slightly forward for better fit.
Hold the pressure gauge in the other hand of the arm without the cuff.
With the trigger in the "out" or "pump" position, rapidly squeeze the bulb until the pointer in the gauge is about 30 mmHg above your systolic (top number) pressure. If you do not know your systolic pressure, try 180. The cuff should feel tight and your arm may feel cramped.
Once the cuff is inflated, stop pumping and position your index finger over the trigger air release valve. Watch the gauge dial face and slowly deflate the cuff by depressing lightly on the trigger until tension is felt. During the measurement phase attempt to keep the deflation rate slow and steady, at 2 to 4 mmHg per second. This requires only light pressure on the trigger. (Note: Inflate the cuff rapidly, and quickly begin pressure deflation to avoid hazards that occur due to prolonged overinflation of the cuff).
As you start to deflate the cuff you should hear nothing. If you hear sound immediately you will have to pump higher before you begin. As the cuff pressure decreases and the pointer falls, the first sound you will hear is a thumping - the first of several similar beats. The point at which these sounds begin is your systolic pressure. Note the position of the pointer.
Continue listening for the thumping sounds. When the sound stops, you have reached your diastolic pressure. Note the position of the pointer. Once you have measured your systolic and diastolic pressures, depress the trigger to the "dump" position and release the remaining air out of the cuff.
Immediately record your systolic and diastolic pressure.
If you are not certain about either the systolic or diastolic pressures, do not immediately reinflate the cuff. Wait a few minutes for normal circulation to return to your arm and begin again.
If you have not been able to hear the sounds clearly:
- You may not have the cuff positioned correctly. Make sure the stethoscope is over the brachial artery.
- You may be in a noisy place and not able to hear clearly. Relax and take your pressure in a quiet place.
- You may not have the cuff tight enough when you begin to pump it. In general, two fingers should fit snugly under the uninflated cuff.
- The sounds are louder if the cuff is inflated as rapidly as possible. Make sure you're pumping quickly.
- The stethoscope ear tips should fit comfortably in your ears, forming an "air seal" to block outside noise. This may take several adjustments of the stethoscope ear tubes.
- People whose arms are extremely large may require a larger than standard sized cuff for accurate measurement. Check with your doctor if your upper arm is larger than 16 in. around.
- For a variety of medical reasons, your blood pressure may be particularly hard to measure. Check your technique with someone experienced in blood pressure measurements if you continue to have difficulty.
What do I need to take my own blood pressure?
- Stethoscope
- Sphygmomanometer (sfig-mo-man-om-eter) or simply, sphyg for short, which includes an inflatable cuff, a pressure gauge combined with an inflation bulb and valve.
Taking your own blood pressure uses the same procedure as taking someone else's blood pressure and it requires the same instruments. However, when taking your own blood pressure it is very difficult if not impossible to position the stethoscope in place underneath the cuff and to tighten the cuff with one hand. Therefore, you will likely need a blood pressure cuff with the stethoscope head pre-positioned underneath the cuff and a cuff with a D-ring for easy one handed operation to take your own blood pressure.
We highly recommend the Welch Allyn Tycos Home Blood Pressure Kit which includes the attached stethoscope with D-ring cuff and gauge.
Gauge
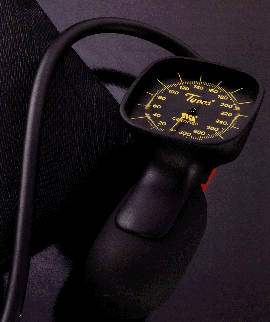
A hand held blood pressure gauge with inflation bulb, as picture above, allows for easy one handed inflation and controlled deflation.
Stethoscope

You will notice that the ear tubes on most stethoscopes can be turned. When using the stethoscope, it is best to turn the ear tubes so that the ear tips are facing slightly forward. This will assure a more comfortable fit, better hearing, and less outside noise.
For more information on using a stethoscope, please visit:
- Stethoscope Anatomy
- Techniques of Auscultation
- Use of your Stethoscope
- Taking Blood Pressure Correctly
Cuff
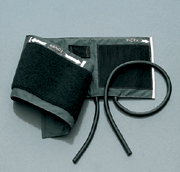
The cuff is a fabric band that wraps around your arm. Inside the cuff is an air tight rubber bladder. This bladder receives the air that creates the constricting force on the arm necessary for blood pressure measurement. The tube of the bladder connects directly to the blood pressure gauge.
On the home blood pressure cuff, there is a metal D-ring on one end and hook and loop fasteners to allow easy one hand adjustment. The stethoscope chest piece is attached directly to the cuff on home blood pressure models to help insure that blood pressure sound will be heard clearly and accurately.
Make the time to learn how to take your own blood pressure. It is an easy, economical and accurate way to monitor your health.